
In this guide, we’ll show you how to install Estuary Switch Kodi build. The build is available for Kodi 19 Matrix and Kodi 20 Nexus. It can be installed on Fire TV devices, Android TV sticks/boxes, and all other Kodi devices.
Kodi builds can often seem intimidating to new users or simply look like a huge change from the good old Estuary Kodi skin. If you have ever felt this way or are just getting started in the world of Kodi builds, Estuary Switch is for you. This is a new Kodi build to install designed to Switch while retaining the regular Estuary Kodi skin (the default Kodi interface) but still bringing the advantages of Kodi builds, such as multiple pre-installed addons and easy access to a wide variety of content. And on top of that, the build is very lightweight, coming in at just 56MB.
Estuary Switch Kodi build works on both Kodi 19 and Kodi 20, and it comes with three of the best addons: Homelander, POV, and Umbrella. POV and Umbrella allow users to access Debrid-only content, while Homelander provides completely free streams in up to 4K.


Beware of Copyright Infringement!
The various Kodi addons that Estuary Switch will install provide legally questionable content. As such, it may be possible to access illegally hosted content through the addons, something that can have legal consequences on you.
To stay safe, we always advise Kodi users to use a reliable streaming VPN such as Surfshark every time they want to stream using the app. Surfshark will protect the user by encrypting all their traffic and spoofing their IP address to make them anonymous.
Why Surfshark?
The VPN provides a superb balance of speed, privacy, security, and price, making it the go-to option for most streamers.
Here are a few of its highlights:
- ⚡ Superb Speeds: Guarantees a smooth live streaming experience.
- 🌍 Huge Server Network: You can connect to a nearby server for a fast and stable connection.
- 😲 UNLIMITED Devices: Connect dozens of devices at the same time!
- 🔑Unblock Anything: Safe access to censored apps, websites and torrent sites.
- 😎 Best in Privacy: The VPN doesn’t keep any activity logs, and so your activities are only known to you.
- 🔐 Top-notch Security: This VPN uses AES 256-bit encryption and provides multiple protocols alongside other security features such as a kill switch, DNS & IPv6 protection and WireGuard.
- 💳 30 Days RISK FREE Money-Back Guarantee: In case you do not like the service, you can get every penny back if you cancel within 30 days!
You can get Surfshark at 82% off using the button below!
💡 However, a VPN is an investment in privacy and safety that will pay itself through the many awesome things you can do with it in your daily internet life!
How to Install Estuary Switch Kodi Build
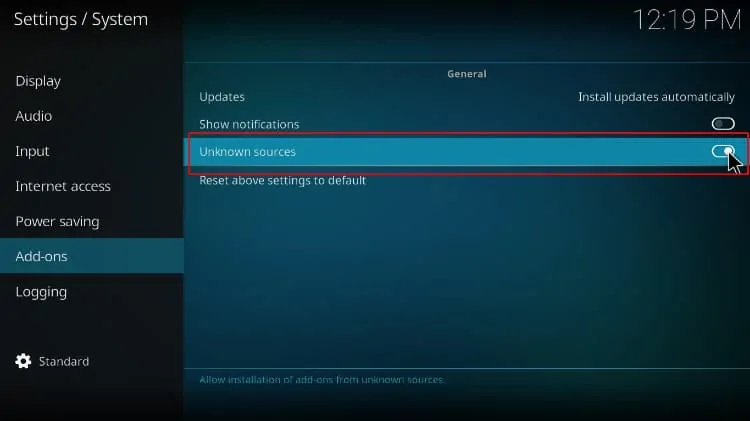
Kodi requires that you enable installation from “unknown sources” before installing a third-party build or anything that is not hosted on the official Kodi repository.
- To get started, launch Kodi and go to Settings by clicking the cog button.

- Now, select System on the settings page.
- Hover over Addons and enable “Unknown Sources.” When you get a warning, just click “Ok.”


You should now be able to install unofficial addons and builds on Kodi.
Add Estuary Switch Host Repo Source
To install The 7o9 repo, which hosts the Estuary Switch Kodi build, we need to add an external URL. At this point, you may need to turn on Surfshark to say safe and avoid ISP blocking.
- After that, go back to Settings and select File Manager.
- Double-click “Add-Source” and type the URL
https://zaxxon709.github.io/repointo the open window. Type “Zaxxon” or any other identifier in the textbox below it, then click “OK.”


Install 7o9 Repo
We can now go ahead and install the host repository.
- Return to the Kodi home screen and click Add-ons from the menu options.
- Click the open box icon on the top left side of the screen.
- Select “Install from Zip File.”
- This will throw a warning. Just click “Yes.”
- Click Repos and select “Zaxxon,” the source we added earlier.
- Select repository.709-x.x.zip (x represents the version number.)
- You will receive a Kodi installed notification when the repo installs successfully.


Install Estuary Switch Kodi Build Wizard (7o9 Wizard)
The wizard that helps install Estuary Switch Build is known as the 7o9 wizard, and we’ll need to install it first.
- While on the same page, click Install from repository.

- Select The 7o9 Repo.
- Choose “Program Add-ons.”
- Click on The 7o9 Wizard.
- You will now get an “Install” option. Hit it.
- The wizard will install, and you’ll get a notification.


Install Estuary Switch Kodi Build
We can now install Estuary Switch Kodi build.
- Go back to the Kodi home page and click on 7o9 Wizard.
- On the next window, select Build Menu.
- Scroll down, and you will see Estuary Switch. Click on it.
- You will get a notification for installation. Click Continue.
- The build will now start downloading and will install automatically after that.
- After installation, you will then be asked to close Kodi and restart it.


You can now restart Kodi and enjoy your new build.


If you wish, you can also customize Estuary Switch through the skin settings menu.
Wrap Up
Estuary Switch is a superb Kodi build that is super lightweight, and it allows users to access both free and Debrid content using three of the best Kodi addons. If you want to check it out, you can use the guide above. However, note that
Enjoy the newly installed Estuary Switch Kodi Build!
Legal Disclaimer: BestDroidPlayer.com is in no way affiliated to any streaming application, apk or its addons. Also, we are not associated with the brands here shown as the references are only informative. Bestdroidplayer.com does not verify the legality or security of any apps, apks, addons or services mentioned on this site. We DO NOT HOST any copyright-protected software or streams and we DO NOT broadcast or provide any copyright-protected streams on this website – The content here provided is only informational and it should be used only to access content that is not protected by copyright. We strongly advise our readers to avoid piracy at all costs, if you decide to do so, it is your responsibility – We are not responsible for any of your activities.
If you wish to make a claim, please check our DMCA Notice Policy.
Affiliate disclosure: Bestdroidplayer.com is reader-supported blog. If you buy a VPN or an amazon product through our links, we may earn a commission that helps mantaining our blog. Our reviews are totally honest and we only recommend trusted VPN and ecommerce brands.


0 commenti